Installing a mini split heat pump in the shop
I recently added a mini split heat pump/air conditioner to cool down my 400sq ft shop. Here’s everything I’ve learned.
Sourcing HVAC Knowledge
I had no HVAC knowledge/experience prior to this project, so I had to learn from scratch.
The Youtube Channels AC Service Tech LLC and HVAC School are GREAT resources to learn from.
I also ordered/read the book(s):
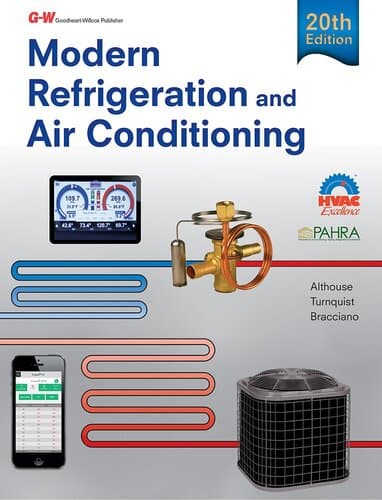
- Above: Modern Refrigeration and Air Conditioning
- This is the same textbook that HVAC technicians learn from when in school.
- It goes over theory and high level ideas. You don’t need to read this but it has good foundational knowledge.
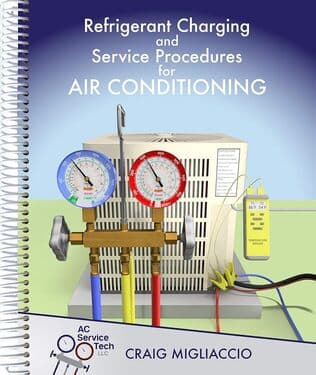
- Above: Refrigerant Charging and Service Procedures for Air Conditioning
- This book is made by one of the Youtube channels mentioned earlier. The book goes over how to use HVAC tools to get the job done. Step-by-step with handy photos.
- It does a very good job explaining the exact steps, and order operations when using HVAC tools.
Let’s get back to mini splits.
Sizing the unit
The industry uses a calculation called the Manual J calculation to calculate the size of an AC you need. It takes into account geographical region, size, air leakage, etc.
The size of the mini split is either described in “tons” or “K”. 1K is 1000 BTU(British Thermal Units). 1 ton equals 12k or 12000 BTU. For reference a standard 3/2 house (1800 square foot) in America typically has a 3 ton unit. or about 36,000 BTU/36K of cooling.
The “easiest” way to calculate your size is to use an online Manual J calculator. Here is an example of such calculator
It has been said that the Manual J calculation tends to be really conservative. For my 400 sq ft space the calculation came out to require a 9k BTU mini split for cooling. That is assuming everything is really well insulated. I might be a little undersized for my application, but we will see over time.
Brand/Model Selection
There are three variables when shopping for mini splits
- Sizing (BTU)
- Efficiency (SEER)
- Brand
These 3 variables affect one output variable. The price.
Sizing is basically chosen for you based on the Manual J calculation. But the last two variables, efficency and brand depends on your personal preferences.
Here is my take on the best to worst brands with no particular rhyme/reason. Just my personal perception.
- Mitsubishi (Best)
- Fujitsu
- LG
- Daiken
- Mr.Cool
- Goodman
- Gree
- Everything else (Worst)
Pick a brand that you(or your contractor) likes. Then pick a SEER value that matches your budget/energy efficiency preference.
In the grand scheme of things for a 9K BTU unit, you are looking at a price spread of bottom barrel(500 dollars) to top of the line(2000 dollars) for both the indoor/outdoor unit. This spread is based on a single zone wall mounted unit.
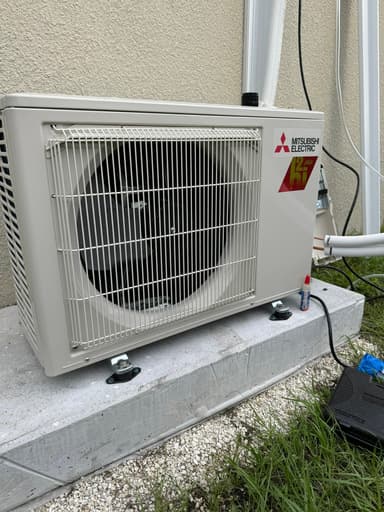
I ultimately chose a Mitsubishi 9K Mini Split (MSZ-FS09NA / MUZ-FS09NAH) a 30.5 SEER unit. It’s the most efficient unit that Mistubushi makes. I chose this over the more efficient Fujitsu (33 SEER) because it has a thermal sensor that will automatically steer the airflow based on your location of the room. Pretty nifty when working in a shop.
One thing to note about Mitsubishi mini splits, they have great technical data on their support website . You can download loads of engineering data and CAD models for your unit.
Thoughts on DIY designed mini splits
There are brands such as Mr. Cool that has made a huge positive impact for DIY heat pump installs. Their claim to fame comes from allowing homeowners to install the mini splits without requiring any specialized tools.
Those specialized tools are:
- Vacuum pump (Evacuate all the air in the refrigerant loop prior to filling with refrigerant)
- Micron gauge (Measure how deep the vaccum is in the system)
- Flare tool (Used to form the copper lines to connect to the units)
- Nitrogen regulator and bottle
- Refrigerant/vaccum hoses
- Refrigerant scale
The tradeoff for being DIY friendly:
- The lineset might be too long for your install. Inevitably having extra lineset coiled up near the outside condenser.
- Refrigerants might be released into a leaking system. You don’t have a way of testing this beforehand with an inert gas.
- The state of the deep vacuum is unknown prior to releasing the refrigerant into the lineset.
All these things affect the “quality” of the install, leading me to not purchase the DIY designed units.
General Install Tips
- Read the installation manual for your unit. It is VERY useful. Then read it again. It is THAT useful.
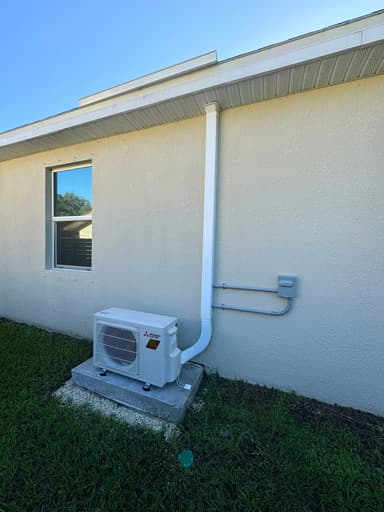
- The fastest/easiest install method is mount the indoor unit on the exterior wall, and punch the lineset through the exterior wall.This eliminates the need for condensate pumps, running line sets through the attic.
- I don’t like punching holes through exterior walls, and I wouldn’t like the location of the inside unit when mounted on an exterior wall. I opted to bring the lineset up through an interior wall and down through the soffit of the house. It is alot more work, but it is much cleaner and less invasive on the structure.
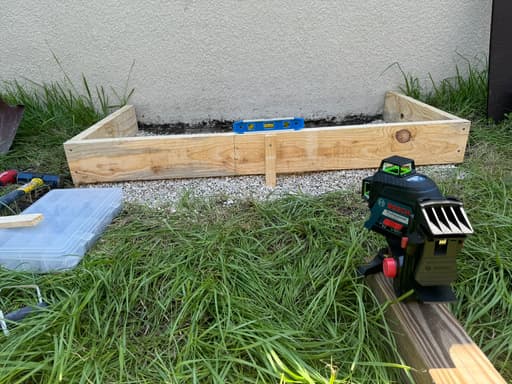
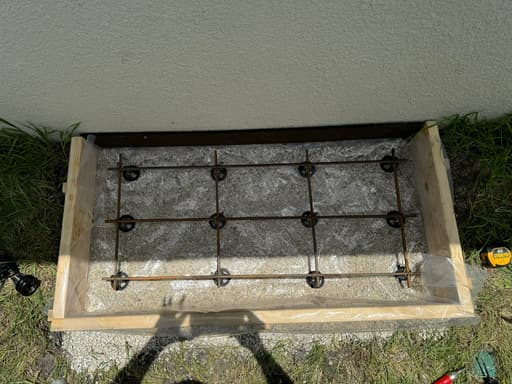
Concrete pad and mounting
The concrete pad for the mini split was a bit overkill. When building this concrete pad, my core goal was to learn the “right” way of doing this.
Here are some notes from making the pad:
-
I lasered in the grade at 1/4” slope per foot away from the building.
-
Rebar chairs were 3d printed due to the low qty required.
-
All rebar was joined via tie wire, and installed with an auto twist tool.
-
I added a plastic sheet on the bottom to slow down the curing rate of the concrete.
-
The only regret of the pad is that it started raining while right before the finishing step.
-
An expansion joint was added between the existing structure and the new condensor pad
-
The concrete was ground flat and chamfered a few days after the pour, since the initial finishing was ruined by the rain.
-
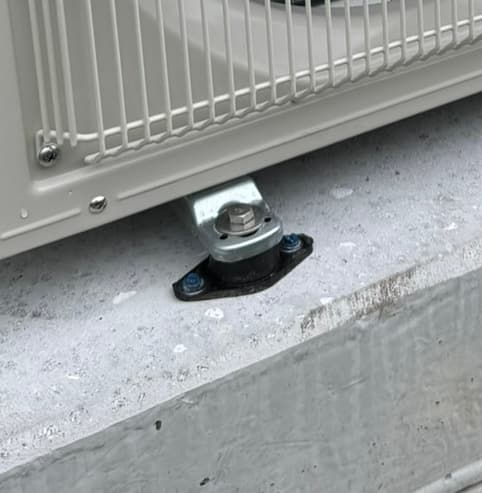
The condenser unit was mounted via rubber isolators, and secured with tapcons and stainless fasteners.
Lineset
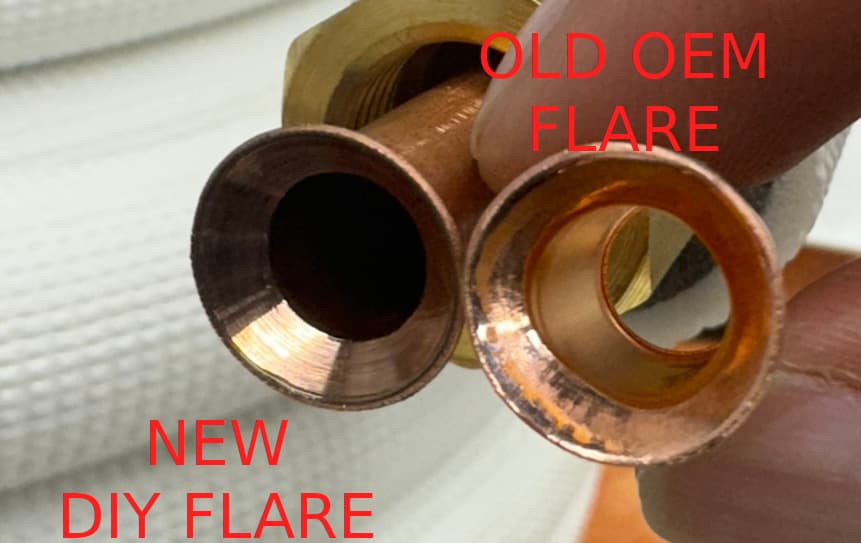
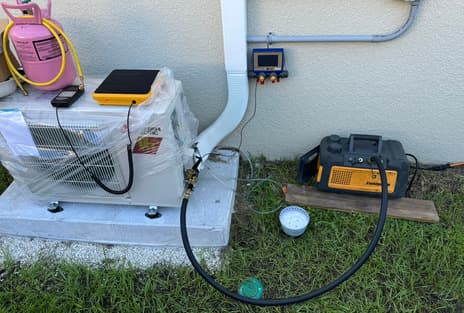
- The factory flares on mini split line sets have quite a few defects. Out of round, dented etc. Cut and reflare is a MUST. Be sure to apply Nylog on the toolhead prior to flaring.
- Use a torque wrench when tightening the flare fittings.
- For the large lineset fitting size (22mm), you can modify an 02 Sensor socket. Most Crowsfoot sizes only go up to 19mm.
- Apply Nylog on the flare faces, NOT on the threads. This will help with sealing
- Purge with nitrogen, and vacuum according to the manual instructions
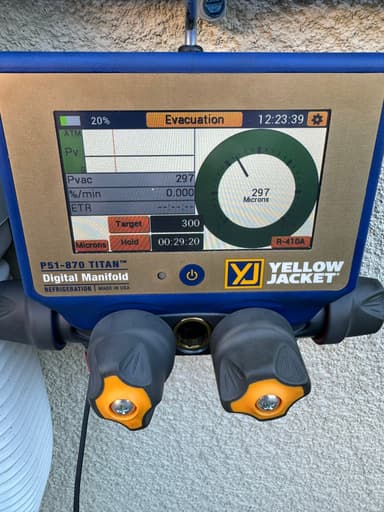
- Removing the valve core via a VCRT (Valve Core Removal Tool) makes for faster vacuuming.
- Be sure to install the valve core AFTER releasing refrigerant. If you do it before, you will compromise your vacuum level.
- Make sure to perform the vacuum rise test. Lower the micron (vacuum), the better. I vacuumed my unit to 297 micron, and held it for over an hour.
Lineset cover
I used the 4” wide Diversi-tech Speedichannel system . I chose this system since it had accessories for flex ducting, and a soffit adapter. Works quite well!
Rain Diverter
My house currently doesn’t have gutters, and I do not want the rain from the roof to directly pour onto the condenser unit. It was installed at a slight angle to provide water from piling up. I bonded this with adhesive instead of nails, in order to prevent punching more holes into the roof.
Condensate Management
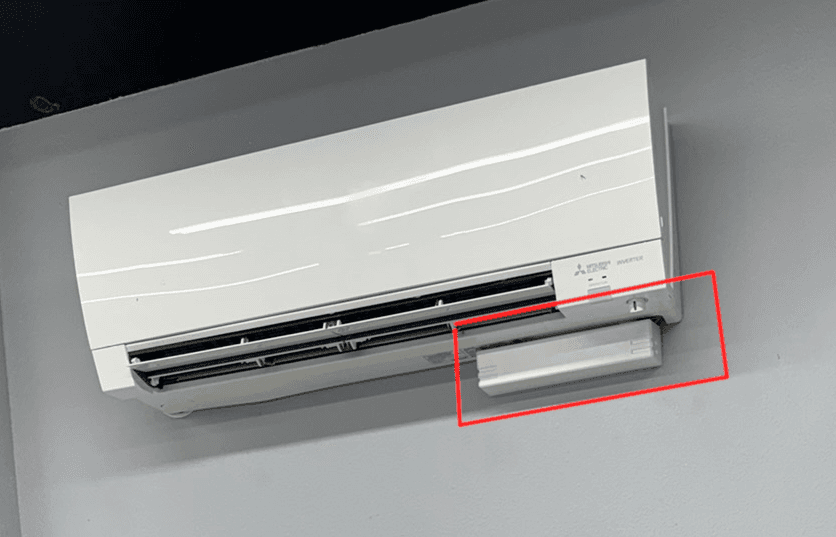
My indoor unit was mounted to an interior wall. In order to remove the condensate, a condensate drain pump had to be installed right below the indoor unit. I like Diversitech products, and chose their Quietmini-M pump product. It is VERY quiet and wires directly into the unit. It will shut off the AC system if the drain pump fails.
Electrical
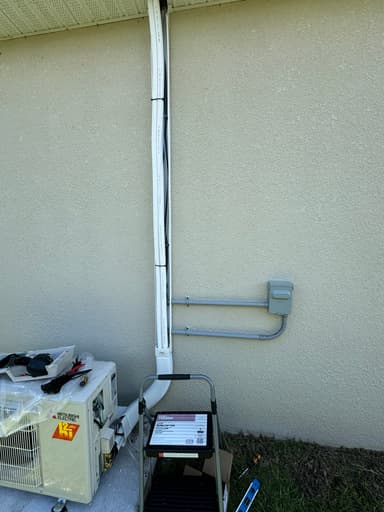
I spent the extra time/money to hide the outdoor electrical PVC within the lineset cover. I’m very happy I did. It prevented punching holes through the exterior wall, and all lines went through the soffit.
Wiring between outdoor and indoor unit
The indoor unit is typically powered by the outdoor unit via 4 conductors. I purchased the Southwire Genesis cable for the job. It is technically a TC-ER-JP cable.
Code related things to think about
- NEC 336.10: Allows for the use of TC-ER-JP cable to used in a similar fashion as Romex (NM) cable
- NEC 210.63: Code requires a 120V circuit within 25 feet of the unit for servicing reasons
- NEC 440.18: You need a disconnect to be mounted with the associated keep out zone
- NEC 210.8: Requires to have GFCI protection for condenser units
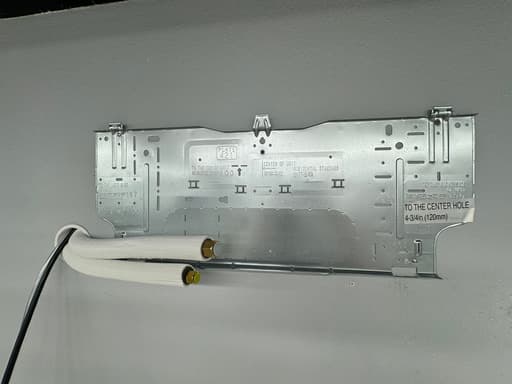
3D printed parts
I made a handful of 3D printed parts to aid with the installation.
Flex Adaptor to Condenser Unit

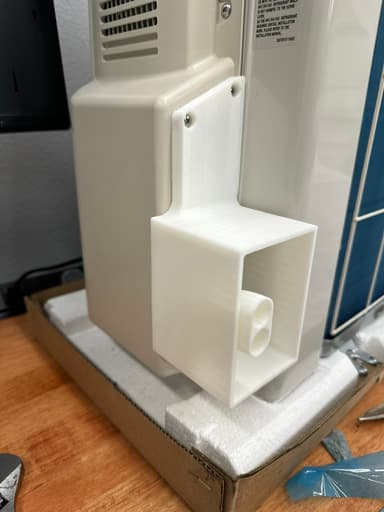
Above: I love the idea of this part. But the condensor unit was too close to wall for the strain relief and packaging to make sense. I had to scrap this part.
Outdoor Condensate Drain line holder
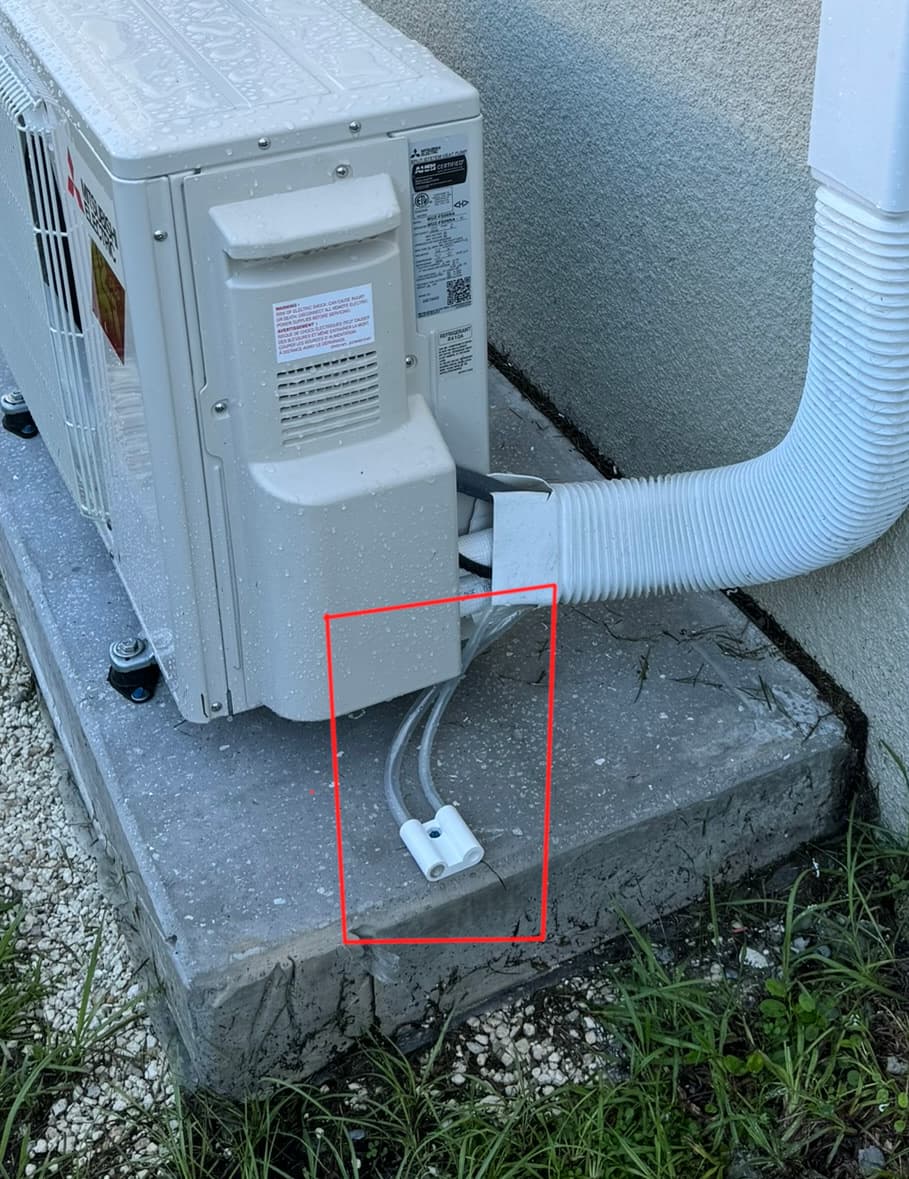
Above:Holds condensate drain line steady while outside. Works perfect.
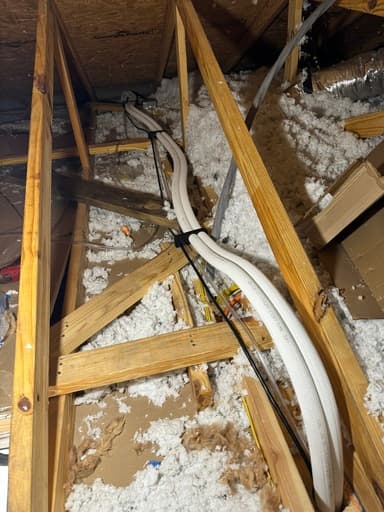
Crawlspace Lineset Holder

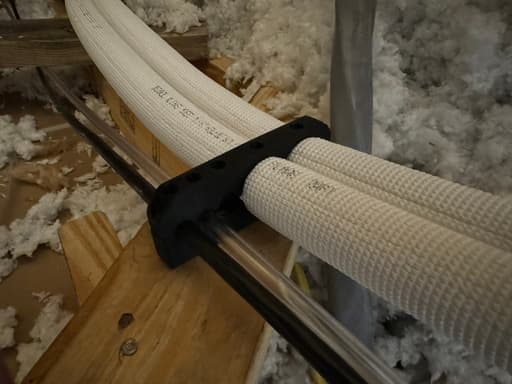
Above: It holds all the crawl space wires/lines nice and tidy.
Things that affect installation quality
If you read online, the general consensus is that installation quality is a bigger factor than the brand/model you pick. What does that really mean? Here are my thoughts on the subject.
- Zero defect flaring of copper lineset.
- Copper was cut square, deburred, and flared with a quality flare tool
- A torque wrench and Nylog was used when joining the flared lines.
- Lineset is purged with N2 prior to deep vacuum
- Vacuum is measured with a proper micron gauge
- Some people just use the manifold gauges, or even worse just run the vaccum pump on a timer.
- Passes a rise test after a deep vacuum. (The vacuum doesn’t rise to X amount after Y time)
- Condensate management
- Line routing doesn’t trap water
- Pump (if used) is wired to shut off unit during failure
- Condensate line is insulated
- Lineset and fittings are properly insulated, taped/sealed.
- Insulation to copper line sealing
- The manual states to tape the ends of the lineset insulation in order to prevent moisture from corroding the interface between the copper and the insulation.
- Any holes are sealed with foam
- Wire management
- Lineset is hidden via lineset covers.
If all those things are done, and to code. I’d say it’s a quality install.
Installation regrets
-
Didn’t insulate the condensate drains in the crawl space
-
Should have mounted/fixed all the crawl space lines before terminating the indoor/outdoor unit.
- The overall install in the crawl space is fine, but I should bolted everything down in the crawl space first in order to package the crawlspace lineset exactly how I want.
-
Not a regret per-say, but I would have prefered to purchase a Mueller lineset that are bonded with plastic corrosion coating, and wrapped with Armacell insulation foam. But I couldn’t find the right set of parts in the QTY I needed
-
Hole for the indoor unit was off by 1/2 inch, I can see the a small part of the edge of the hole from the shop.
-
Flex adapter design/mfg time. The unit was too close to the wall, and I couldn’t use it.
-
Use heatshrink to seal the ends of the copper lineset with the insulation, to prevent moisture buildup under the lineset insulation
Related post-install tasks
- Investigating UV lights to install in the indoor unit, to prevent mold build up
- Insulate the condensate drain
- Insulate the ceiling and the main door of the shop.
- Mold might start to grow in the indoor unit. I’ll monitor this over time.
- Data log the power consumption, and temp change before/after insulation installation
Costs
- Total Material Costs
- $3676
I installed everything myself. Everything you see below are pure material costs in 2024.
Please note: For the tool cost, my father had the Yellow Jacket guages that he just gave me. That is not included in the tool price. The rest of the tools were purchased preowned when possible. Except for the flare tool, I don’t trust used flare tools due to the chance the tool head is damaged.
Total cost of heatpump minisplit
9K BTU single head wall mount DIY installed Mistubushi 30.5 SEER
| Item | Cost |
|---|---|
| Concrete Pad | $253.80 |
| Electrical Wire/Breakers/Fittings | $353.66 |
| 30’ Lineset | $109.29 |
| HVAC Tools | $651.87 |
| Mini Split Unit | $1,955.00 |
| Rain Diverter | $59.68 |
| Condensate management | $161.77 |
| Lineset cover and mounting | $130.72 |
| Total | $3,675.79 |
Conclusion
Working in an air conditioned shop is life changing. I’m very happy that I installed this, and I need to finish a couple of the post install steps. As well as collect temperature/energy data.
Feel free to sign up on the email list below to be notified when I do this, or the next project I work on.
Did you enjoy this website?
Operating at the intersection of mechanical, software and electrical engineering is wildly interesting for me.
These projects can take months to complete, and I'd love to email you when I post new content.
Similar to other personal websites. I will never spam or distribute your email.